Wednesday, 14 October 2015

The Roberts Collection Dungarees - In Vintage Olive floral

Hi lovely folks,

Today I am back with a bit of garment sewing, if you keep up to date with my Instagram @hannahjanefellows its pretty much all been about the home decor over there recently.


That was until the lovely Marilla Walker got in touch and asked if I would like to try out one of her new patterns from her new collection, and I jumped at the chance. Marilla makes fabulous patterns, if you don't already know of them you can see them here and here.

I decided to start with the dungaree pattern, because I have been wanting some loose legged turn up dungarees for a while now, and I loved the detailing on these!

My dungarees are made in a Vintage wool mix olive green floral fabric.

I made these in a straight size 7 and I know that there have been some mods to the pattern since then, but I love them so much! I haven't made any mods to the pattern, I like to make it true to pattern when I am testing. 


They are so comfortable to wear, I cant wait to make a million other versions! I chose the wool mix for my first version so they would have some drape, in case I had got the sizing a little large, but next time I am hoping to make these up in a lovely denim or linen.


There are so many lovely details within this pattern, like the fine straps, or the neat waist tucks, which make it just that extra bit feminine.  

( please excuse the twisted straps, I was sure they were lying flat) 

There are several other patterns included in The Roberts Collection that are all equally beautiful, the Pinafore has my name written all over it, as does the blouse, and the jumpsuit would make a great seasonal outfit. 

Head on over to Marilla's blog to read more about it and to go buy the pattern for yourself. If you only buy one pattern this autumn, I can highly recommend this one!

Thanks for stopping by again guys! 

Have any of you purchased this pattern yet?
Are you hoping to make something from The Roberts collection?  

I would love to hear about it, drop me a message in the comments below!


Tuesday, 1 September 2015

Up-cycled vintage foot stool - My first Upholstery

Hello lovely folks,

So I am back today with some rather exciting news, after months and months of waiting we finally.... got the keys to our new (old) house this week! We could not be happier, but the beaming happy faces soon turned into determined, hard working faces as we set to, and started to tear the inside of the house apart from top to bottom. I am not going to go into details, but it needs work, I thought however you might be more interested in seeing what I have been sewing to go inside the house...it's far more exciting than the piles of rubble that currently reside within the house ;)

So, a couple of years ago we started to pick up the odd bit of furniture we liked, in the hope that one day we would have our own home to put it in (yay! we made it) and on one of our Sunday trips to the car boot we spotted a vintage footstool. 

It was in a right mess to be honest, the sponge had started to disintegrate, the fabric was a delightful deep olive green velvet with a fringing around the edge, that even the most eager of vintage lovers would have turned their nose up at. I took one look at it and said, we will have it, it has potential!

I am so glad we did, because it cost me £2!! And today I am so happy with the end result.


I have never done any re-upholstering before so it was all new to me. It was a really simple process and the only thing we needed other than my sewing machine was a screwdriver to remove the legs and a staple gun ( we used an electric one) 


I found the fabric online through Ebay of all places, I fell in love with the fractured triangles pattern and couldn't resist it. I bought two meters of it, and it is excellent quality, it is really heavy weight and it also has the Fire Retardant coating on it as well which is really important to think about when upholstering something. I hope to use the rest of the fabric for other things in the living room.


We decided to spray the legs gold to bring it up to date a bit, they were originally black plastic, so our options were limited. 

I am kind of kicking myself for not taking a before picture.... I will try and remember for the next project!!

I had so much fun transforming this foot stool and seeing it come back to life after looking so shabby. I feel that even after buying the new sponge and the fabric, it still remains a good value piece of furniture, but not only that it is unique. I am now looking forward to finishing up my next re-upholstery project which is slightly larger in in scale to put in mildly.... stay tuned!

Thanks for stopping by!!

~HJF~


Friday, 14 August 2015

Abakhans July project of the month winner!

Hi guys, 

Just a quick post to say I am blown a away to have been chosen by Abakhan to be one of their July Project of the month winners!

My entry to the competition was my International Anna Party dress! you can read more about that here.


I love shopping at Abakhan because they have such an unusual selection of fabrics. I have been gifted a voucher to spend online or in store, it's all very exciting!!

If you would like to read more about it, see the other two fabulous winners or just check out the details so you can enter next month follow this link and have a little read!

Well I think that's all the excitement over for now!

Speak soon :)

~HJF~


Thursday, 13 August 2015

Boat neck swishy holiday dress

Hello....

Yes, that is what I am naming this post, because well, today I am writing to tell you about just that,  the boat neck swishy dress I made for my recent holiday to Wales.

I have been in a bit of a wardrobe awkward phase at the moment, largely in part to changes in figure, and half of my clothes being in storage. I felt that summer has just passed me by and I have just kept on wearing my winter clothes. This just would not do, you see the thing was, we were going on holiday... to Wales, probably one of my favourite places to holiday in. I couldn't go away without a new summer frock, the situation needed to be rectified. 

So, in usual Hannah style, the day before we go on holiday, I decide to open the fabric stash cupboard doors, find a suitable candidate and locate my favourite easy to sew pattern.

I had recently bought a large piece of Viscose/Rayon from Abakhan fabrics in Bolton and decided that this would be the perfect choice for my summer dress. It is a lovely black and cream wobbly striped print that I hoped could be dressy or casual.

Next was my pattern of choice, this is a self drafted pattern. It has transformed and morphed over the years. It started life as a princess seamed sundress and gradually morphed into several different patterns, one being a boat neck bodice. The thing about this bodice is that it only has one bust dart, which is really unusual for me, I usually need more than one bust dart to achieve the shaping I need. I think the key to its success is that the darts are shaped, the dart legs are not straight lines, helping give the extra shaping needed.

The skirt for this pattern varies, I have several ranging from full circle to gathered circle and quarter circle, but in this case I was rushed on time, couldn't locate my gathered skirt pattern pieces and just gathered two rectangles and hoped for the best..... bad sewing... I know! I was rushing!!!

So here it is, my Boat neck swishy holiday dress.... 


I always use bias binding as a facing to finish the neck and armholes on these self drafted dresses. This Viscose/Rayon was so soft the only thing I had in my stash that was a good match for the softness of the fabric was a hot pink, so there is a nice surprise flash of colour on the inside of this dress! 


The Viscose/Rayon worked perfectly for this dress and I was so happy with the amount of drape that it had in the skirt, and it also gave nice soft lines to the bodice. I got a large piece from Abakhan and still have enough left to make something else.


I have made so made versions of this dress now, but I still keep coming back to it, I think that it has become so invaluable to have a self drafted pattern that can be adapted easily, but that also sews up quickly. I also find with this pattern that it is very versatile, I have made several casual versions, but  I also made a version last year to get legally married in, but that's a whole other story. :)


Also, here is a nice extra photo......It got really windy when I was taking the photographs, and so the trees were hitting me in the face.... as you can see from the picture below it doesn't make for a good photo shoot!....ha!!

Thanks for stopping by today guys, it has been a bit of a sewing whirlwind since the International Anna Party, and I still feel so much excitement over that! I haven't had much time to sew, but I am slowly sneaking moments here and there when I can. I was lucky enough to be gifted some wonderful patterns from By Hand London through the International Anna Party, so I am really looking forward to sewing those!!

Do you have a sewing pattern that is your all time favourite?

Is drafting patterns something you do or are commercial patterns your favourite?

I would love to know, drop me a message in the comments below!

~HJF~


Monday, 27 July 2015

The International Anna Party... A round up with some excitement!!!!

Hi guys,

I am back today after what seems like forever. I have been rather swamped lately with small sewing commissions, stitching gifts for people, and have been snowed under with a rather large project that I can't cant share with you lovely folks yet. But all in all I haven't had much time to sew for myself, let alone blog about it, I am not complaining, I like to be busy....

But when I saw that the ever lovely and oh so talented @lauralovespugs  (or Elle) was hosting a virtual birthday party for herself  over on Instagram with her two wonderfully talented friends @Ute_ig and @magdalenesmuse I decided I needed to make time to be a part of this!!

Now, the theme for the party was an International Anna Party. Anna being the Anna dress pattern by the By Hand London team.

If you haven't heard about this party over on instagram over the last week.... where have you been?? ha ha!! No, OK well here is the link to the lauralovespugs blog, where she tells you all about why the party came about, and all the updates on the happenings throughout the party process. I urge you to go and have a read, I really do, it is a lovely story of friendship and sewing and.... well just go read and see for yourself what this whole party was all about!!

So for the party the challenge was to make an Anna dress for yourself and post a photograph of yourself wearing your Anna party frock over the weekend of the 17th-18th July under the  #internationalannaparty .

I however have never made an Anna dress before, I bought the pattern at Christmas maybe? but I have just never quite gotten round to making it up. So with two weeks to go I decided, lets do this and make me an Anna.

I toiled myself a straight up size knowing that I would have to do some alterations, but was pleasantly surprised by how little I actually had to do.

The skirt was perfect straight out of the packet....hmm incredible?
With the bodice I decided to lower the bust pleats and grade from a larger size on the lower half to a smaller size on the top half.
Oh  actually I had take about 35cm off the skirt length, because... I'm not a giant?!

I should mention at this point it is now Wednesday before Anna party. (if you read my blog regularly you may be detecting a theme... the last minute sewing theme) So Wednesday I set to cutting out my Anna dress, I realise I have no zip, ha ha. So I quickly change my pattern pieces around to lay my CB bodice on the fold of the fabric, sorted. I find a short regular zip that I will insert under the arm, in a lapped style so it wont be visible. I get most of the sewing done Wednesday just zip, facings and hems to do on Thursday.

I decided I wanted to take my photo on Thursday Evening in the hay field outside the back of my house, just before the sun set. So I raced against time and got it finished just in time!! yay!!

Just my luck the weather was hilariously windy as you will see in the photographs....


So.... I should probably mention that I was incredibly lucky to be selected from lots of amazing ladies that had made Anna dresses over on Instagram to be in the Semi Final of  the competition....and it was this photograph that was my entry...

The nine fabulous semi finalists were then sent to the team at By Hand London who then picked three finalists, I am happy to say I was one of those too!! There is a little link to the By Hand London mini round up here.

The three finalists then went into a public vote over on @lauralovespugs Instagram account, where people got to choose which Anna dress was their favourite!!


I am so overwhelmed to say that I won!! A huge thank you to everyone who voted for me, I was completely blown away, it was really unexpected, so thank you!!


So here I am wandering about in the field, I think our neighbours probably wondered what the heck I was doing...as I was alone in the field with just my camera and my remote clicker!


I had such fun with this dress, I loved wearing it and I can't wait to take it on holiday with me. As I earlier mentioned it was rather windy when I was taking these photographs, so you can't really see, but the dress is floor length with two double knee high splits....

I tried for a picture with my hair down, but that didn't end well....ha ha


I have to say I love this dress, I can see myself making lots more versions of this too! It is so simple and quick to make. I made this version in a lightweight cotton making it an everyday dress but made in a silk or something heavier and it could be something really special!!

So here we have it my lightweight Ikat cotton maxi Anna dress.


Finally I just want to say a HUGE thank you to @lauralovespugs @Ute_ig and @magdalenesmuse for throwing such an awesome party for all of us sewing folks!! There was a huge amount of hard work that went into planning the party!! I had such a great time, and seeing all the different Anna dresses was such a treat!! It was such a great way to meet new Instagram friends too, that's what I like about these events! Growing the sewing community.

 I would also like to thank By Hand London who put me through to the final and who are very generously giving us finalists a PDF pattern of our choice!! Which pattern to choose, too many good ones!!

There were soooo many Anna amazing variations at the party, if you are ever thinking of making the Anna dress, be sure to check out the #internationalannaparty for a wealth of inspiration!! 

Well that's all for now, my next sewing adventures are some holiday basics, due for next week!! nothing like a bit more last minute sewing.

Did you take part in the International Anna Party?

Have you made the Anna dress yet?

Has the International Anna Party inspired you to make the Anna dress?

Would love to hear your thoughts??

~HJF~


Tuesday, 23 June 2015

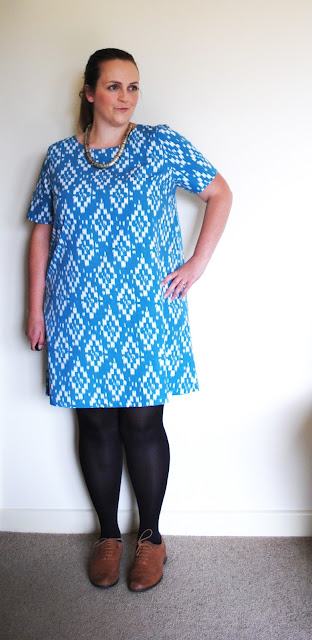
Vintage Blue Ikat Ultimate Shift Dress

Hi Guys,

Today I am back with a little bit of me sewing, a simple Sew Over It London, Ultimate Shift Dress. I have been sewing a lot for others over the last few months, and not really had a lot of time to sew anything for myself. The last last dress I made, the Liberty Alpine dress, I made to go to a Craft Party in and I made to a deadline, so ultimately I was rushing up until the last moment to finish it in time. Cue hand sewing til midnight... totally worth it though :)

And the same goes for this dress really, just finished in time for a deadline.  Last week I was sewing some gifts up and it got to Thursday and I checked the weather report for my trip out on Saturday.

Now, if you haven't already realized I live in England...  and as most will well know, it is pretty much essential to check the weather report if you want to go anywhere. I was travelling to another part of the UK and I was informed we would have sunshine!  oh hello!Well, I was not prepared for that!

 So after checking my wardrobe and finding that I didn't have a single thing suitable I decided I would have to whip something up. Truth is I have just not had time to update my summer wardrobe, I have been so busy with other projects and because summer just doesn't seemed to have arrived here yet, there hasn't exactly been a rush on the sleeveless vests and sundresses! The summer wardrobe is now edging closer to the top of my list.

On a side note, I really need to stop this last minute sewing, I don't enjoy it very much, and I don't want to start putting pressure onto a skill that I really love... sewing. I need to plan more, and put time aside to sew the things I really need to fill those gaps in my wardrobe, not just last minute sew things when I have been too busy to plan ahead... not good.

Anyway... Me, a trip out, sunshine, nothing to wear. I decided I didn't have time to go too fancy, and if I wanted to make something I had just Friday to do it. So, I opted for the lovely Sew Over It London Ultimate Shift Dress pattern. I guess you could say this has become a bit of a well loved pattern for me. I think I have made four altogether and I find it a really quick garment to put together with really pleasing results.

Next up was choosing the fabric, I had a quick look in my fabric stash and pulled out some rather lovely Vintage Ikat blue cotton. This fabric was a rather lucky find from a local Vintage Fair. They don't usually do textiles there but there was a lady selling home furnishing fabrics and she had two pieces of this wonderful stuff! I think in total it cost me £6 for the lot, and I only used one of the pieces, so I am now wondering what to make with the second piece?! Suggestions would be very welcome!!

So am I going to stop chatting about the weather like a typical Brit and show you the dress...


The print had a bit of a crazy pattern to it and if  wanted to follow grain and keep those diamonds running parallel down my body it meant that the diamonds seemed to go on a bit of a wander across by body. I think that is just the pattern though and it was the best possible placement without loosing those strain grain parallel diamonds. Hey, I am happy and sometimes with vintage fabrics you just have to go with it, I have had countless pieces that the prints are all kinds of crazy off grain, but I think I just about get away with this one... 


I was a little worried about this colour on me. I loved the colour, but I was worried it would make me look larger, but I think keeping the silhouette clean with a simple shift dress has help to minimize that.


This is the first Ultimate Shift Dress i have made with short sleeves and I really love them! I was a little skeptical at first as I usually go for a three quarter length as I find that a flattering for me, but this could be my new summer sleeve length!!!


And if any of you are wondering if  got my dose of sunshine.... I totally did not...it rained and poured all day, so much so I put on my tights and brogues instead of my sandals. You win some you lose some.


 Here I am on my way down to see my friend, we were stuck in traffic, in the rain, but I was just too excited to be seeing my friend and wearing my new dress. (I wasn't the driver by the way) ;)

That's all for now, I am back to sewing for others for the moment, and I am eagerly awaiting the next gap so I can get sewing my summer wardrobe!!

Do you have any favourite patterns that you return to when you are in need of a quick make?
I am always interested to hear!

I am also open to suggestion to what I can use my left over Ikat fabric for? I have just over a meter left and feel a bit clueless about what to use it for. If you have any suggestions please drop me a message in the comments below. :)

Thanks for stopping by...

~HJF~


Wednesday, 17 June 2015

Thirty gifts for Thirty - Algebra Bow tie and pocket square

Hi  there guys!

Today I am back sharing one of my favourite makes from the Thirty gifts for Thirty series. I have been having a lot of fun making menswear recently, but one of the items I have found I love making are bow ties! I started making them last year when Mr. F requested one for our wedding, then I cranked things up a notch when I made him eleven for Christmas last year. I had a blast making them, choosing different fabrics, some from my stash, and treating him to some new ones in some snazzy prints!

So naturally when I came to making the birthday gift list I had to include the odd bow tie in there somewhere! The hardest part was choosing the fabrics, there are so many amazing fabrics out there, I was really spoiled for choice. I decided to go for a bit of a Maths theme... it seemed fitting after all.

I have drafted this pattern from scratch and have made a few mods to get it to this point, but I think I can finally say I am happy with the proportions and the finishes.

Here we have it gift number four.... the Algebra Bow Tie and Pocket Square.


I love this fabric so much it is Moda Elementary Equations, and it is so lovely to work with. I bought it from The Village Haberdashery and my pattern for both the pocket square and the bow tie fits perfectly onto one fat quarter. Talk about stash busting!! 


I had a lot of fun with the packaging on these guys too....first up is the pocket square!


I like the wrap around packaging you get on fancy items sometimes and tried to mirror that style...
Next up is the bow tie packaging, I am kind of proud of this one...


These dapper treats went down a treat with Mr. F and I  am pretty happy with the packaging prototypes too. 

Thanks for visiting my blog, It means a lot that you folks stop by to visit :)

That's all for now, I will be back with more birthday related treats soon.


~HJF~


Monday, 15 June 2015

Thirty gifts for Thirty - Mens Keyboard wallet

Hi all,

Today's post is yet another instalment of Thirty gifts for Thirty, where I challenged myself to make twenty handmade gifts for my husband for his thirtieth birthday! 

Today I wanted to show you the handmade wallet I made for him. I wanted to make him a simple fold over wallet but with a bit of personality, so I set about drafting a quick pattern. 

I wanted a simple design with a fold down the centre, a place to hold notes and cards, and that's it. 

I came up with the pattern fairly quickly and set about sewing. I decided I would take step by step photographs of each stage so that I could make a tutorial with the hope of giving my pattern away as a free download. It was the first time I have made an accessory pattern with the intent to make public, it is usually garments patterns I draft for myself, so I tried to be organised about it and made sure I documented each step.

 It all went together fairly quickly, I made a couple of silly mistakes near the end, but I think that was just due to tiredness. I ended up remaking the whole wallet because I had handled it so much by this point it looked a mess! But I got it together and finished it off in time for his birthday.

 I can't say I am overly happy with the finished product, it just doesn't look professional enough for me. So after taking all of the photographs and drafting the pattern, I decided not to post my tutorial after all. I think I am better sticking to the garment making and this has definitely taught me that small accessories are not my thing! But I am ok with that, you know, I am a garment girl at heart, and that's ok. I have loved sewing clothes for as long as I can remember, so maybe this little accessory adventure didn't go quite to plan because my heart wasn't really in it (it was, I wanted to make Mr. F a rad wallet) but who knows, I am ok with not being a whiz at the old wallet making. Pass me the dress patterns any day....:)

So here we have it, gift number three...


As you can see in this photograph the corners are not square, this is due to the amount of bulk, even though I trimmed out all of the excess. I am not sure how I would eliminate this next time?


The two lovely fabric I used were from The Village Haberdashery.


Here is the finished gift with the label attached. Although I am not completely happy with the finished product, it still taught me a lot, and it taught me about what I enjoy sewing too. I really thought I would enjoy sewing this, but I really didn't. I guess there won't be too many more wallets in my future sewing plans. ;) 

Are there things you sew that you don't particularly enjoy sewing? 

Are there any things you sew that you know you find difficult?

 I would love to hear about them in the comments below! 

Thanks for stopping by. 

~HJF~ 

Sunday, 14 June 2015

Thirty gifts for Thirty - 80's Striped beach shorts

Hi guys,

My next installment of Thirty gifts for Thirty is a super simple pair of 80's Striped beach shorts, made from a vintage pattern.


I have used this pattern several times to make shorts and pajama bottoms for Mr. F and they have turned out great. The pattern is so simple and quick to sew up that you can have a snazzy pair of shorts in around an hour...


Or you should be able to if you don't encounter any problems. I had a bit of a nightmare with these shorts, well, not the construction but the lead up to it. I bought some fabric from Abakhan from the quilting cotton section, because I wanted something lightweight but with some body to to it. I selection a nice green and white striped pattern that I thought would go well with pretty much everything.

 As most will know at Abakhan the vast majority of its fabrics are sold by the weight, and are displayed in wire baskets for you to rummage through to your hearts content. I love a trip to Abakhan, as I usually come back with something really quirky. but I have shall we say, had the odd mishap when buying fabrics from there. I found my fabric, checked the yardage and I had just enough to fit my shorts pattern on there nicely.

Now I bought this fabric weeks in advance of making these shorts and I didn't think to even look at it again once I got it home, foolish me. A few weeks later when I got the fabric out to cut out the shorts I noticed a stain, then another, then another... but these were not easily visible, and I had obviously missed them under the shop lighting, there were dye marks, streaked all through the fabric.

 Anyway, I didn't have time to return the fabric, or buy new, and I tried all my best stain remover techniques and nothing would shift the dye. I had to alter the shorts pattern to take some of the fullness out and do some serious pattern placement wizardry to get these bad boys to fit on to the dye free remaining fabric. I managed it with only a few specks on the waistband which when gathered, they are completely unnoticeable and one small patch on the leg. I had planned to add some embellishments to the shorts once they were finished anyway so I just covered the dye spot with a original 80's woven patch. My mum kindly donated it to me, it has been in her sewing box since she used to sew for me and my bro and was intended for a pair of my brothers shorts way back when.

So here we have them, gift number two of Thirty gifts for Thirty, nothing super spectacular, but a pretty functional pair of beach shorts....


These shorts are a basic design with just an elasticated waist, fake fly front and side seam pockets.


Here you can see the fabric a little clearer and of course that amazing woven patch! Secretly I am super jealous of the patch and wish there were two then I could have had one for a shirt or something, I think it is pretty rad!


I also did labels for the shorts as well, this time as a swing design.


Sadly no modeled shot as it has been way too cold here to even think about getting the shorts out! 
But Mr. F liked them, so I am hoping that they will be a success this summer.

Thanks for stopping by to see some of my menswear makes! I have really enjoyed sewing for someone other than myself, and I am hoping to sew some more menswear for my Dad soon. It is getting rather close to Fathers Day over here....

 Has anyone been making anything special for their dads?

Would love to hear if you have any special fathers day projects lined up?

~HJF~


Thursday, 11 June 2015

Thirty gifts for Thirty

Hi Lovely people,

Today I am back with a bit of a different post, still my usual sewing, but this time it isn't for me!

So, early may Mr. F turned 30, and to mark this pretty special occasion I wanted to make him something really awesome!! The problem was I wasn't really sure what, I know that probably sounds awful, but I just couldn't settle on one gift idea. So, in the end I decided, why have one gift when you can have thirty.... I mean that is the rational jump to make isn't it?! Everyone else was with me on that one right?! hmm thought so.....

So I set to making a list of gifts I wanted to make for Mr. F ( if you haven't guessed already, that's my husband ha ha, thought we should just clear that one up) I decided to try and make a gift for each of his thirty years would be way too ambitious so I whittled it down to a mere 20... the rest were token gifts that I bought throughout the year leading up to his birthday.

I thought it would be fun to share with you some of the gifts that I made for Mr. F. It has been my first real adventure into menswear, so I hope you stick around for the next few posts :)

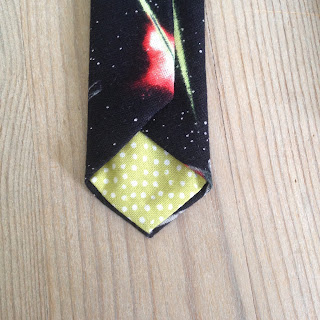
First up is the Star Wars skinny tie


I have made a few ties this year as it seems to be the year of our guys turning thirty and ties make a great gift! The original skinny tie pattern is from the See Kate Sew Blog , which is a great place to start. I have however made some mods to the pattern and use a more traditional method of assembly to create the point lining you see below.


If you are looking for a few tips on Tie making or, like me you work better with a few visual aids, I found this really helpful video that also has a downloadable pattern. They walk you through the whole tie making process and every step is made very clear.

Tie Making Tutorial Video on Youtube - Not my content!


I bought official Star Wars Quilting cotton a while ago and it was perfect for this project, I lined it with some scraps of quilting cotton in a neon green because it matched the lasers so well!!


The finishing touches I decided to create for my gifts were packaging labels for each gift, now at this point in the game I think I had lost the plot a bit.  I was making hand made gifts, then making labels to make each gift look shop bought..... but I am still glad I did it, it was a lot of fun and I think it finishes off each gift nicely. 


I really enjoyed making this tie, it was so quick to put together! The hand sewing really is the most time consuming part, but I did most of that watching Season 3 of the Killing (I know, I am late to the party on that one!). 


That's my first installment of Thirty gifts for Thirty, I hope you have enjoyed seeing something a little different on my blog.  I will get round to posting gift number two shortly.....

When I decided to make my twenty gifts, I set myself a schedule but as ever, things take a little bit longer than expected. I had NO idea this would turn into the crazy challenge it did! This was just gift one and was a breeze... :)

Do you make a lot of handmade gifts or do you mainly sew for yourselves? 

Have you ever set yourselves a crazy challenge or deadline for someones birthday? I would love to hear about it!

As ever thanks for stopping by!

~HJF~


Monday, 8 June 2015

Alpine Liberty Emery Dress

Hello guys,

Today I am back with another Emery Dress. I am rather a fan of the Emery Dress by Christine Haynes, and although this is only my third, I can see many more of these in my future. 

I made my first ever Emery during Selfish sewing week, it was made from some lovely vintage Peter Pan cotton that was donated to me by my Aunty and you can take a peek at it here

This is my third Emery and I have made some quite significant changes to the pattern to get the fit right for me. I would like to say I did an FBA straight away, like I should have, but I didn't, and in the end I have made multiple changes to the bodice pieces and I think I am now finally quite happy with the fit I have. 

This has been one seriously popular pattern, I mean googling it brings up a whole host of AMAZING variations of this dress. The thing I really like about this pattern is that is seems to be flattering for a lot of different body shapes, which is not something you can often say about a pattern. Yes, I had to make a lot of adjustments to get the fit right, but I do with most commercial patterns. 

For me this pattern is such a great staple, I feel I can make a really simple version like this one, to be worn casually, or choose a really special fabric and make it for a special occasion. 

For this version I decided to cut into my stash of Liberty Fabrics....

During the half-term holidays Mr.F decided he wanted to take me to Standfast and Barracks factory shop in Lancaster. This is the home of Liberty printing, where they print not just their cloth, but John Lewis', Christian Lacroix, Sanderson etc. There they sell misprints of these designer fabrics, some of it may be that there was just a flaw at the beginning or the end of the roll so they couldn't sell the whole roll, some there may be a slight shift in the print or a flaw that runs the entire length of the fabric. However the times I have been I have been very lucky in that most of the flaws are unnoticeable or are easy to work around in the cutting out stages. 

Now, I love Liberty fabric, in a sense that the quality of the fabric and the prints is incredible. I am not however super keen on florals. I like the odd floral piece here and there, but I tend to go for the more abstract ones. I do love the Liberty Art prints through and have had my eye on a few of the geometric designs for some time, I have some of the Queue for the Zoo in my stash which is also a particular favourite. So when we went to the factory shop I had a few prints in mind I was hoping they might have. I was a little disappointed in that most were florals that day but it is completely hit and miss depending on the printing process. 

I did however find a print that I have been eyeing up for some time....I believe it is called Jonathan B and I first saw it a year ago. I loved it because it reminds me of pencil shavings, which believe it or not used to be part of my job, sharpening pencils. Ha ha. I also love it because it reminds me of the alps, with mountains and fir trees. I was lucky enough to grab this for £3 a metre and it doesn't have a single flaw on it, lucky me. 


There was just two metres left which was enough for me to squeeze a long sleeved Emery out of it, with a few bits left over (maybe for a bow tie, who knows). 

And here we have it, I should probably mention at this point that I made this dress for kind of a special occasion. I was attending an Etsy Craft Party run by the store Berylune in Leamington Spa. I was also meeting up with an all round awesome gal and fellow sewer for the first time too, so you see, I needed me a new party frock! 


Here you have the extra secret Liberty pockets.....


You may notice in the photographs that I have my sleeves rolled up, well this was a style choice, initially I wanted to make the sleeves three quarter, but I am still having issues with my sleeve fit, they are too baggy, so I decided to make them a little longer and roll them up to give the dress a more casual look. 

I love this dress and I felt very comfortable in it all night. The bodice is fully lined and I decided to hand stitch down not only the lining waist but the lining armholes too, I am not a fan of having the overlocking on the shoulder seams visible on the inside, so I hide them all in the lining, nice!  This means that the only visible overlocking is on the skirt side seams and the sleeve side seams.


I can see lots of versions of this dress in my future wardrobe planning, I have a few I would like to make for our up and coming summer holiday. I am hoping to redraft the bodice to accommodate some shaping to the armholes to make a sleeveless version, wish me luck. 

Are there any other Liberty Fabric fans out there?

Do you have a favourite Liberty Fabric you are waiting to buy?
 I would love to hear what your favourite prints are!

Did anyone else attend an Etsy Craft Party? 

Thanks for stopping by guys!

~HJF~


Instagram