Monday, 15 June 2015

Thirty gifts for Thirty - Mens Keyboard wallet

Hi all,

Today's post is yet another instalment of Thirty gifts for Thirty, where I challenged myself to make twenty handmade gifts for my husband for his thirtieth birthday! 

Today I wanted to show you the handmade wallet I made for him. I wanted to make him a simple fold over wallet but with a bit of personality, so I set about drafting a quick pattern. 

I wanted a simple design with a fold down the centre, a place to hold notes and cards, and that's it. 

I came up with the pattern fairly quickly and set about sewing. I decided I would take step by step photographs of each stage so that I could make a tutorial with the hope of giving my pattern away as a free download. It was the first time I have made an accessory pattern with the intent to make public, it is usually garments patterns I draft for myself, so I tried to be organised about it and made sure I documented each step.

 It all went together fairly quickly, I made a couple of silly mistakes near the end, but I think that was just due to tiredness. I ended up remaking the whole wallet because I had handled it so much by this point it looked a mess! But I got it together and finished it off in time for his birthday.

 I can't say I am overly happy with the finished product, it just doesn't look professional enough for me. So after taking all of the photographs and drafting the pattern, I decided not to post my tutorial after all. I think I am better sticking to the garment making and this has definitely taught me that small accessories are not my thing! But I am ok with that, you know, I am a garment girl at heart, and that's ok. I have loved sewing clothes for as long as I can remember, so maybe this little accessory adventure didn't go quite to plan because my heart wasn't really in it (it was, I wanted to make Mr. F a rad wallet) but who knows, I am ok with not being a whiz at the old wallet making. Pass me the dress patterns any day....:)

So here we have it, gift number three...


As you can see in this photograph the corners are not square, this is due to the amount of bulk, even though I trimmed out all of the excess. I am not sure how I would eliminate this next time?


The two lovely fabric I used were from The Village Haberdashery.


Here is the finished gift with the label attached. Although I am not completely happy with the finished product, it still taught me a lot, and it taught me about what I enjoy sewing too. I really thought I would enjoy sewing this, but I really didn't. I guess there won't be too many more wallets in my future sewing plans. ;) 

Are there things you sew that you don't particularly enjoy sewing? 

Are there any things you sew that you know you find difficult?

 I would love to hear about them in the comments below! 

Thanks for stopping by. 

~HJF~ 

Sunday, 14 June 2015

Thirty gifts for Thirty - 80's Striped beach shorts

Hi guys,

My next installment of Thirty gifts for Thirty is a super simple pair of 80's Striped beach shorts, made from a vintage pattern.


I have used this pattern several times to make shorts and pajama bottoms for Mr. F and they have turned out great. The pattern is so simple and quick to sew up that you can have a snazzy pair of shorts in around an hour...


Or you should be able to if you don't encounter any problems. I had a bit of a nightmare with these shorts, well, not the construction but the lead up to it. I bought some fabric from Abakhan from the quilting cotton section, because I wanted something lightweight but with some body to to it. I selection a nice green and white striped pattern that I thought would go well with pretty much everything.

 As most will know at Abakhan the vast majority of its fabrics are sold by the weight, and are displayed in wire baskets for you to rummage through to your hearts content. I love a trip to Abakhan, as I usually come back with something really quirky. but I have shall we say, had the odd mishap when buying fabrics from there. I found my fabric, checked the yardage and I had just enough to fit my shorts pattern on there nicely.

Now I bought this fabric weeks in advance of making these shorts and I didn't think to even look at it again once I got it home, foolish me. A few weeks later when I got the fabric out to cut out the shorts I noticed a stain, then another, then another... but these were not easily visible, and I had obviously missed them under the shop lighting, there were dye marks, streaked all through the fabric.

 Anyway, I didn't have time to return the fabric, or buy new, and I tried all my best stain remover techniques and nothing would shift the dye. I had to alter the shorts pattern to take some of the fullness out and do some serious pattern placement wizardry to get these bad boys to fit on to the dye free remaining fabric. I managed it with only a few specks on the waistband which when gathered, they are completely unnoticeable and one small patch on the leg. I had planned to add some embellishments to the shorts once they were finished anyway so I just covered the dye spot with a original 80's woven patch. My mum kindly donated it to me, it has been in her sewing box since she used to sew for me and my bro and was intended for a pair of my brothers shorts way back when.

So here we have them, gift number two of Thirty gifts for Thirty, nothing super spectacular, but a pretty functional pair of beach shorts....


These shorts are a basic design with just an elasticated waist, fake fly front and side seam pockets.


Here you can see the fabric a little clearer and of course that amazing woven patch! Secretly I am super jealous of the patch and wish there were two then I could have had one for a shirt or something, I think it is pretty rad!


I also did labels for the shorts as well, this time as a swing design.


Sadly no modeled shot as it has been way too cold here to even think about getting the shorts out! 
But Mr. F liked them, so I am hoping that they will be a success this summer.

Thanks for stopping by to see some of my menswear makes! I have really enjoyed sewing for someone other than myself, and I am hoping to sew some more menswear for my Dad soon. It is getting rather close to Fathers Day over here....

 Has anyone been making anything special for their dads?

Would love to hear if you have any special fathers day projects lined up?

~HJF~


Thursday, 11 June 2015

Thirty gifts for Thirty

Hi Lovely people,

Today I am back with a bit of a different post, still my usual sewing, but this time it isn't for me!

So, early may Mr. F turned 30, and to mark this pretty special occasion I wanted to make him something really awesome!! The problem was I wasn't really sure what, I know that probably sounds awful, but I just couldn't settle on one gift idea. So, in the end I decided, why have one gift when you can have thirty.... I mean that is the rational jump to make isn't it?! Everyone else was with me on that one right?! hmm thought so.....

So I set to making a list of gifts I wanted to make for Mr. F ( if you haven't guessed already, that's my husband ha ha, thought we should just clear that one up) I decided to try and make a gift for each of his thirty years would be way too ambitious so I whittled it down to a mere 20... the rest were token gifts that I bought throughout the year leading up to his birthday.

I thought it would be fun to share with you some of the gifts that I made for Mr. F. It has been my first real adventure into menswear, so I hope you stick around for the next few posts :)

First up is the Star Wars skinny tie


I have made a few ties this year as it seems to be the year of our guys turning thirty and ties make a great gift! The original skinny tie pattern is from the See Kate Sew Blog , which is a great place to start. I have however made some mods to the pattern and use a more traditional method of assembly to create the point lining you see below.


If you are looking for a few tips on Tie making or, like me you work better with a few visual aids, I found this really helpful video that also has a downloadable pattern. They walk you through the whole tie making process and every step is made very clear.

Tie Making Tutorial Video on Youtube - Not my content!


I bought official Star Wars Quilting cotton a while ago and it was perfect for this project, I lined it with some scraps of quilting cotton in a neon green because it matched the lasers so well!!


The finishing touches I decided to create for my gifts were packaging labels for each gift, now at this point in the game I think I had lost the plot a bit.  I was making hand made gifts, then making labels to make each gift look shop bought..... but I am still glad I did it, it was a lot of fun and I think it finishes off each gift nicely. 


I really enjoyed making this tie, it was so quick to put together! The hand sewing really is the most time consuming part, but I did most of that watching Season 3 of the Killing (I know, I am late to the party on that one!). 


That's my first installment of Thirty gifts for Thirty, I hope you have enjoyed seeing something a little different on my blog.  I will get round to posting gift number two shortly.....

When I decided to make my twenty gifts, I set myself a schedule but as ever, things take a little bit longer than expected. I had NO idea this would turn into the crazy challenge it did! This was just gift one and was a breeze... :)

Do you make a lot of handmade gifts or do you mainly sew for yourselves? 

Have you ever set yourselves a crazy challenge or deadline for someones birthday? I would love to hear about it!

As ever thanks for stopping by!

~HJF~


Monday, 8 June 2015

Alpine Liberty Emery Dress

Hello guys,

Today I am back with another Emery Dress. I am rather a fan of the Emery Dress by Christine Haynes, and although this is only my third, I can see many more of these in my future. 

I made my first ever Emery during Selfish sewing week, it was made from some lovely vintage Peter Pan cotton that was donated to me by my Aunty and you can take a peek at it here

This is my third Emery and I have made some quite significant changes to the pattern to get the fit right for me. I would like to say I did an FBA straight away, like I should have, but I didn't, and in the end I have made multiple changes to the bodice pieces and I think I am now finally quite happy with the fit I have. 

This has been one seriously popular pattern, I mean googling it brings up a whole host of AMAZING variations of this dress. The thing I really like about this pattern is that is seems to be flattering for a lot of different body shapes, which is not something you can often say about a pattern. Yes, I had to make a lot of adjustments to get the fit right, but I do with most commercial patterns. 

For me this pattern is such a great staple, I feel I can make a really simple version like this one, to be worn casually, or choose a really special fabric and make it for a special occasion. 

For this version I decided to cut into my stash of Liberty Fabrics....

During the half-term holidays Mr.F decided he wanted to take me to Standfast and Barracks factory shop in Lancaster. This is the home of Liberty printing, where they print not just their cloth, but John Lewis', Christian Lacroix, Sanderson etc. There they sell misprints of these designer fabrics, some of it may be that there was just a flaw at the beginning or the end of the roll so they couldn't sell the whole roll, some there may be a slight shift in the print or a flaw that runs the entire length of the fabric. However the times I have been I have been very lucky in that most of the flaws are unnoticeable or are easy to work around in the cutting out stages. 

Now, I love Liberty fabric, in a sense that the quality of the fabric and the prints is incredible. I am not however super keen on florals. I like the odd floral piece here and there, but I tend to go for the more abstract ones. I do love the Liberty Art prints through and have had my eye on a few of the geometric designs for some time, I have some of the Queue for the Zoo in my stash which is also a particular favourite. So when we went to the factory shop I had a few prints in mind I was hoping they might have. I was a little disappointed in that most were florals that day but it is completely hit and miss depending on the printing process. 

I did however find a print that I have been eyeing up for some time....I believe it is called Jonathan B and I first saw it a year ago. I loved it because it reminds me of pencil shavings, which believe it or not used to be part of my job, sharpening pencils. Ha ha. I also love it because it reminds me of the alps, with mountains and fir trees. I was lucky enough to grab this for £3 a metre and it doesn't have a single flaw on it, lucky me. 


There was just two metres left which was enough for me to squeeze a long sleeved Emery out of it, with a few bits left over (maybe for a bow tie, who knows). 

And here we have it, I should probably mention at this point that I made this dress for kind of a special occasion. I was attending an Etsy Craft Party run by the store Berylune in Leamington Spa. I was also meeting up with an all round awesome gal and fellow sewer for the first time too, so you see, I needed me a new party frock! 


Here you have the extra secret Liberty pockets.....


You may notice in the photographs that I have my sleeves rolled up, well this was a style choice, initially I wanted to make the sleeves three quarter, but I am still having issues with my sleeve fit, they are too baggy, so I decided to make them a little longer and roll them up to give the dress a more casual look. 

I love this dress and I felt very comfortable in it all night. The bodice is fully lined and I decided to hand stitch down not only the lining waist but the lining armholes too, I am not a fan of having the overlocking on the shoulder seams visible on the inside, so I hide them all in the lining, nice!  This means that the only visible overlocking is on the skirt side seams and the sleeve side seams.


I can see lots of versions of this dress in my future wardrobe planning, I have a few I would like to make for our up and coming summer holiday. I am hoping to redraft the bodice to accommodate some shaping to the armholes to make a sleeveless version, wish me luck. 

Are there any other Liberty Fabric fans out there?

Do you have a favourite Liberty Fabric you are waiting to buy?
 I would love to hear what your favourite prints are!

Did anyone else attend an Etsy Craft Party? 

Thanks for stopping by guys!

~HJF~


Monday, 1 June 2015

Me Made May 2015 Round up!

Hi all,

Today I am back with a round up of all of my Me Made May outfits. I have to say I started this challenge thinking I would just enter the odd day here and there when I could but in the end, I wore me made clothing every day for the month of May. It was however a challenge and I will get to that later. First lets do a round up, the fun bit, with photographs, yay!

Ok outfit one was my Tartan Linden sweatshirt, which I really enjoyed wearing layer over a shirt, this worked for me.

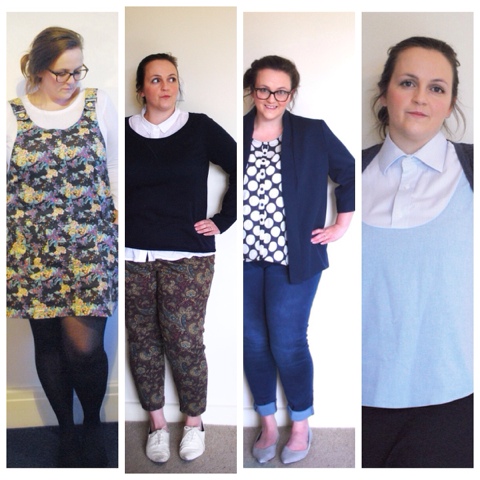
Outfit two was one of my Dungaree dresses that I drafted from a RTW dress, this gets worn a lot, and I love it.

Outfit three is my Grainline studio alder shirt dress layered with a jumper, I think I prefer it like this as the neck is a little large so the jumper helps hide this a little ;)

Outfit number four were my Sew Over It Ultimate Trousers in a paisley pattern, super comfy like a stretch jean and also get a lot of wear because of that. 

Outfit number five is a chiffon tunic dress, self drafted, that has a silk yoke made from a scarf, I used to wear this for work a lot (with trousers, not leggings, fear not) but I think I have fallen out of love with it....

Outfit number six, I think is up there with my favourites, my self drafted polka dot vest and my By Hand London Victoria Blazer in a navy crepe?


Outfit seven is my Grainline studio Alder shirt dress shirt refashion which you can read more about here. 

Outfit eight is a self drafted boxy top made in some striped stretch satin viscose, this was made to wear to work but still gets a lot of wear now. 

Outfit nine is the same self drafted top as outfit eight but in grey chiffon and with a faux black collar and back neck keyhole detail, again this is old now and used to get a lot of wear to work. 


Outfit eleven is another pair of Sew Over It Ultimate Trousers, this time in a stretch cotton featuring a tile print.

Outfit twelve is my Grainline studio Linden dress hack which can be seen here.

Outfit thirteen is my Parrott party frock or Emery dress if you like. I love this dress, it would have been better with ought the tights but it was way too cold!

Outfit fourteen is another self drafted boxy top in a really cool digital printed chiffon I picked up earlier this year and made during selfish sewing week, read more about that here.

Outfit fifteen is my Ikea fabric house print dress in a self drafted pattern. I loved this dress when I made it but looking at it now I am not so sure.

Outfit sixteen is my self drafted vest again, this has proven to be so useful to layer up between seasons.

Outfit seventeen is another dungaree dress in navy cotton twill, nautical is my favourite. 

Outfit eighteen is my third and last pair of Sew Over It Ultimate Trousers in a Tartan cotton. 


I skipped one day of Me Made May, well I didn't, I was still wearing my super comfortable snowflake Linden but I had come down with tonsillitis and wasn't feeling the selfies so I had a few days of accessories and stand ins to get me through.

Outfit nineteen is my latest and most favourite newly knitted bobble hat, I can't remember the yarn I used but it is wonderful.

Outfit twenty is my mustard scarf, which technically isn't me made at all, but Mum made. She made a piece of batik cloth for me with polka dots on it the hemmed it to make it into a scarf, it is the softest thing ever and rather dear to my heart. 

Outfit twenty one, Mr. F stood in for me and modelled one of the bow ties I made him for Christmas, it is a favourite of mine, I wish I had a matching party frock of the same fabric!

Outfit twenty two is my Carolyn Friedlander Nest Egg Tote which double as a handbag. 


Outfit twenty three is my Peter Pan vintage fabric emery which was also made earlier this year during selfish sewing week.

Outfit twenty four was my newly drafted t-shirt style top with cuffs, soon to be blogged. 

Outfit twenty five is my Sew Over It Ultimate Shift Dress in a cotton lounging leopards print. 

And that about sums it up, I have left out any repeats, as I am pretty sure seeing twenty five selfies of me is enough to last anyone a lifetime! 

I didn't think much of it when I signed up the this challenge, I just thought, hey, this will be fun, I might get to meet some new people and get some inspiration. It was so much more than that! 

When I have looked back though my photographs of the month I can honestly say there are very few outfits that I am really happy with. So I decided I needed to analyse this and do something about it. 

I took a look at the outfits I really liked and tried to narrow things down a bit. 

And as it turns out, this is it. Twelve out of twenty five and I am still not sure about a couple of these but I think that has more to do with fit than anything else. 


I looked at what I was left with and it still didn't fill me with joy, it wasn't a whole wardrobe of garments that I could piece together to make outfits. 

The other outfits that didn't make the cut were just, not me anymore, I think it is a combination of poor choice of colour and just out growing a style. 

So here are my findings from my Me Made May challenge.

I do not make enough me made comfortable clothes, I tend to make clothes for occasions, dresses mainly, this is ok, but I am at home a lot at the moment and party frocks just won't cut it! 

I do not have a colour palette so my me made clothes do no coordinate particularly well, this is fine for individual garments such as dresses, but for separates, it would be nice to be able to coordinate my pieces. 

I do not make many warm items of clothing, so, when the weather is bad I am often left wearing RTW items that I am not happy with.

So, I have decided I would like to do a bit of a wardrobe overhaul and reassess what is missing from my wardrobe. I can then draw up an action plan of how to fix it. 

In my next blog post I will go into more detail about my plan to make my me made wardrobe work for me! 

Lastly I would just like to say a huge thank you to everyone that took part this year. I have met some amazing, inspirational people through this challenge, people I would not normally have had a chance to chat to, everyone has been so welcoming and supportive. The sewing community really is a great thing to be a part of. 

If you have taken part in Me Made May this year and have found it helpful, I would love to know why? 

Has it helped you identify gaps in your wardrobe? 

Has it made you realise which are your favourite me made items of clothing and which go largely unworn?

Or have you just seen people's entries into the Me Made May challenge and are inspired to join in yourself next year?

Let me know in the comments below...

~HJF~ 

Thursday, 14 May 2015

Linden Sweatshirt Dress - Paisley Vintage Jersey

Hi all,

It feels like an age since I have written a blog post! I have been so busy with birthdays and the like that posting has been put on the back burner. Well I am back today with a super quick sewing fix!

I have been doing a lot of sewing recently some of which I hope to be sharing with you guys in the coming weeks, but I kind of overloaded my self and needed a bit of a break. So I have had a week without sewing pretty much, which for me felt kind of crazy! But this week I gave in and decided I needed a quick simple project to get me back at the sewing table. 

Firstly let me explain, I have a 'to sew' list which changes on occasion but mostly I work my way through it and am pretty happy, but the weather has kind of made that a challenge recently. I had planned my next batch of sewing to be vests, summer tops, dresses, things for my holiday. In fact I had a whole post based around it ( but lets not talk about that shall we) but when the weather decided to stay wet, grey windy and well, very cold I decided, all this summer sewing just won't do! 

I got out my Linden Sweatshirt pattern from the ever faithful Grainline Studio and decided, I NEED more sweatshirts. So that was that, I cut out a lovely grey knit sweatshirt from my newly modded pattern and thought this will be my sewing fix. For some reason I wasn't quite content with that, so I went back to the fabric cupboard and sought out my Vintage paisley cotton jersey. 

I feel I must explain, this is stuff of legends, it is 100% cotton and so thick it could keep you warm in winter like a blanket, it is wonderfully stable, sews like a dream and.....is over two meters wide!
Where did I find such a magnificent piece of cloth, well like most of my snazzy prints it was handed down to me from my Aunty. Back in the day when there were multiple fabric shops on the high street, my Aunty would go and buy amazing fabric so cheaply it now makes me feel a little queezy just thinking about it. She would not only buy for herself but for me when I was a kid, so she has amassed a rather large stash of pretty rad 70's, 80's and 90's prints that she very generously donates to me when I am looking to make something super snazzy.  


Okay, sorry, getting back to the point, I got a little off track there with the whole 80's fabric shopping nostalgia. I  have saved this particular piece of fabric for about eight years, yes, that's right, eight years, I love it that much. I decided it was time to cut that 80's fabric up and have myself a new dress by the end of the day. I wanted a dress that would see me through the pretty poor weather we have been having, something I could wear with tights and a shirt underneath, but equally just on its own in the summer. I wanted to make myself a t-shirt smock dress and decided that the Linden Sweatshirt pattern was the perfect place to start.

I wanted a smock t-shirt style dress, so I set to shortening the the Linden bodice, adding some shaping and then cutting two rectangles to give the gathered skirt I wanted.

Here we have it, I think it fits the purpose I made it for, it is perfect for layering, but also great for when the weather gets a little warmer. I purposely made it just long enough so I could go bare legs if it ever gets warm enough here and the wind drops.... this is not a dress for a windy day...


I have to say I finally had some success with the neckband on this Linden, I feel super happy with the finish on it. ( I was getting a little jealous over here of everyone's wonderful Linden necklines)  I have had a little trouble with this in the past and thought it was perhaps just me being a sloppy sewer.... but as it turns out it was my fabric. My previous two Lindens were out of crazy unstable knitted fabrics that laddered when stretched so adding the neckline had been a challenge. I feel it looks neater this time around, yay for stable jersey!


Here I am laying up my dress because as predicted by the time I had finished my dress it was still mighty cold and I needed my shirt and tights to keep me warm. 


And here is how I hope to wear it if the weather gets a little warmer, however by that point I hope that my legs won't quite blend in to the magnolia colour on the walls quite like they do now.... lets just say I need some sunshine......


I am pretty happy with my quick sewing project, I think I will be making a few more, possibly in a woven next time just to make things a bit cooler for the summer.


I would love to know if you have tried any hacks out with the Linden Sweatshirt pattern. If so please let me know in the comments below!

~HJF~


Wednesday, 22 April 2015

Tartan Linden sweatshirt view B - and a tale of badly printed knit fabric woes....

Hi all,

Today I am back with my second Linden sweatshirt by Grainline Studio. I received this pattern for christmas and was pretty quick to whip up a first edition that you can see here. When I made my first Linden I was so eager to make it I just decided I would make the biggest size as that seemed right according to my measurements I did not however account for the HUGE amount of stretch my knit fabric had, and I mean huge. My first Linden could keep me and seven other people warm all at the same time!! So second time around I decided to be a little bit more cautious, and plan a little better. I do try and plan my my makes really well, but I think I always let myself down when it comes to stretch and knit garments, I tend to forget there are equal if not more fit issues with a stretch garment than with a woven.  

I worked out that my new tartan knit fabric had no where near the amount of stretch my last fabric had but I still felt that I needed to come down a couple of sizes. I was making view B sweatshirt with the intention of it being layer over a shirt so I didn't want it to be too baggy or too long. I opted for a size 14 and kept the original view B length. 

One thing I also noted on my first linden was that the neckline came out huge on me (think over the shoulder, audition for FAME, do you need some leg warmers with that, wide), so I decided to grade the neckline down from a 14 to a 10. I know this might seem like a huge jump but I wanted a much closer fit around the neck than last time. (I am under no illusions I am a size 10 here folks, have no fear!) 

Ok so the after all the grading and tracing I was like, yeah, awesome, the fun bit, cutting out! I had bought me some lovely drapey tartan knit from Abakhan sometime last year. At the time I wasn't really sure what I wanted to do with it but then I got the Linden pattern as part of my sweet christmas haul and I figured they were a match! So I buy quite a lot of dressmaking fabric from Abakhan, it means I can buy ends of bolts at very reasonable prices for the most part. I also like to shop there because they have a lot of imported prints and It is my ONE and only local fabric store if I don't want to venture into the depths of Manchester which right now isn't an option for me on a regular basis. 

My tartan knit is not my usual colour scheme, because well, there is colour in it, but I liked the shades and I guess the thing that swayed me was the GOLD, it has a metallic gold printed check in the tartan pattern, and I completely blame my magpie eye here, I feel metallic prints on fabrics are still emerging and It fell into my basket with few questions asked. I did not however anticipate the hassle this fabric would give me. 

I decided I was going to be a good seamstress, pattern match all my side seams, pattern match my raglan seams and step back in sheer wonderment at the gold tartan joy I had just created. Yeah, well, that really didn't happen did it, I knew as soon as I lay my fabric out on the counter top to cut it out we were not going to get along. The print was so badly off, and I mean so badly, I had to make a decision. Do I go with the vertical stripes running vertical to my body and all of the other horizontal stripes being off, or do I go with all the horizontal stripes perpendicular to my pattern centre front and the vertical stripes being off. Well I went with the first option, I decided that the bold black vertical lines that ran down the tartan would look much more obvious if they were running all crazy across my body, so this meant my horizontal tartan lines are all kinds of crazy (see bottom hem) but there was literally nothing I could do. I am not happy but I had the fabric and I wanted that Linden. If there was something I missed I would love to know, please comment below :) 

So that kind of meant pattern matching my side seams was near impossible and pattern matching my raglan seams was also going to be difficult. If I am honest here I decided it wasn't worth it, in order to get any sort of match I would have had to completely throw off the one way stretch of the knit and I just wasn't willing to do that and compromise on fit and drape. So no pattern matching for me, but you know what, I think I am ok with it, because in the end, this sweatshirt is all kinds of crazy. 

First photograph please.....


You can barely see the metallic gold here, and I feel I need to justify my fabric buying boo boo, so here is the GOLD......


I had a couple of problems with the neckline on this sweatshirt, I cut the band to a size 12 even though I had graded the neck to a 10. I hoped that the extra length would stop the fabric over stretching and making the neckband too thin, but I think next time I will go up even another size to a 14 neckband so it comes out a little thicker. I know this is mainly a problem when using the same fabric for the neckband as the body of your sweatshirt, when I did a little research other people seamed to have had similar experiences. 


Ooh look at those non pattern matched raglan sleeves ha ha... Shocker!! 


One slightly unusual choice for me on this sweatshirt was that I have decided to keep the hem raw, now I may live to regret this (or not regret it but just put it under my cover stitcher and hem it) but that is my choice for now and I kinda like it! I think that this fabric has a wonderful drape and just lends itself well to being left raw, but we will see. 
 
 
This is pretty much how I hoped to wear this sweatshirt with a shirt underneath, nothing too fancy.
 
Today however Is the hottest day yet and after snapping these pictures the weather was warm enough to warrant shorts and t-shirts.... should you so wish!
 
Thanks for stopping by guys, I will be back soon with more details of my pledge for Me Made May.
 
~HJF~


Instagram